About WooCommerce
WooCommerce is an open-source, completely customizable eCommerce platform for entrepreneurs worldwide for building an online business. Woocommerce is built on top of WordPress.
Features
Connect WooCommerce to Mailpro to increase sales and grow your business. This zap enables your e-commerce store to interact with your Mailpro account so you can automatically create or update contacts, send upsell emails, and email/ SMS order confirmations without lifting a finger.
Here are some ways to use WooCommerce with Mailpro:
- Subscribe all clients who make an order to your newsletter.
- Contact list synchronization and management.
- Send a welcome email to new customers.
- Instead of reacting hours after the fact of abandoned carts. Set up an integration to update contacts with an abandoned cart event and send an email to the customer through Mailpro.
- The first thing you'll need to do is login to your Wordpress installation and make sure you have the Woocommerce plugin installed and activated, and then the Zapier Add-On for Woocommerce installed and activated as well. You can download the Add-On by logging to your WooCommerce account and clicking on the Downloads Tab. Install the Add-On in your Wordpress installation.
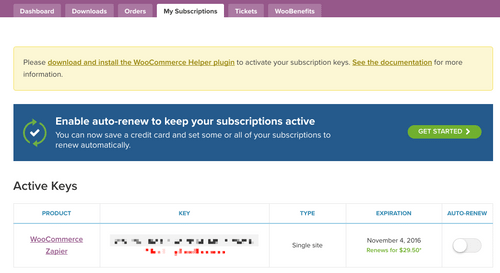
- Once the WooCommerce Zapier plugin is installed, as it is a paid add-on, you need to go back to your WooCommerce account dashboard and copy your Key under the My Subscriptions tab.
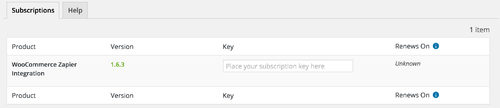
- Go back to your WordPress Admin dashboard, navigate to the WooCommerce Helper page. Paste the key on the text box for the Zapier Integration and now you can start creating a New Zapier feed under your WooCommerce install.
- Now login to Zapier either with a Google account, Facebook account or with an email and password. If you don’t have a Zapier account, you can create one.
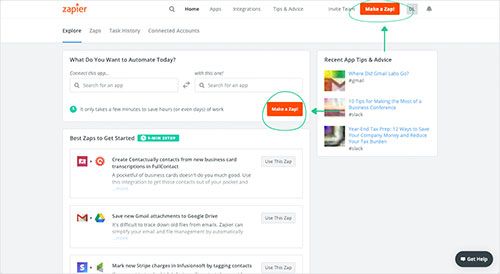
- After you login you can look for Mailpro in the search bar on top of the page, to find all Mailpro’s zaps or templates we already created. You can also click on the “Make a Zap” button and in the resulting page look for Woocommerce to start a Trigger event that will execute an Action in Mailpro.
- You will need to select the Trigger event in Woocommerce, and then you will be provided with a Zapier Webhook URL for Woocommerce (do not close Zapier window).
- Go to your Wordpress dashboard. Navigate to the WooCommerce > Zapier Feeds page and click the “Add New” button.
- Choose the Trigger event for Woocommerce and paste the copied Zapier’s Webhook URL into the Webhook URL field. Add a Title for this Zapier feed and click “Publish”. You should receive a message saying that the Zapier Feed is active and ready to receive real data.
- After this you can switch back to Zapier and click "Continue" button. This will share form data with Zapier to make the zap work correctly. You may be asked to finish setting up options for the Trigger event to work.
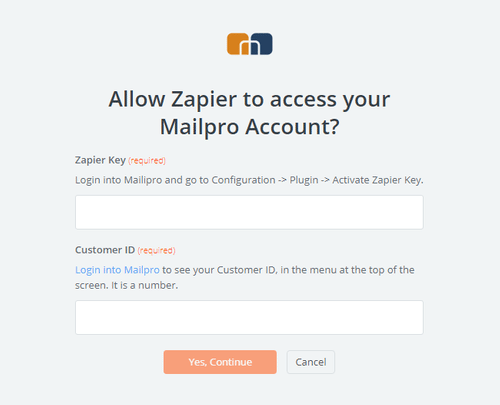
- In Zapier you will have then to select the Action event in Mailpro, and you will be asked to sign in to Mailpro and grant access to your account, in order to access the information needed for the zap to work, and receive data from the other application. Usually this login is done once and it’s kept archived in your Zapier account for future use.
- After you sign in to Mailpro you may be asked to finish setting up options for the Action event to work. It could be associated to contacts, messages or SMS. Depending of each type of information, just follow the steps and instructions presented. You can verify that the connection is working and then you click in the “Done” button.
- At the end of the setup process you need to activate or turn on the zap in order for it to start working.
- Build your customers' buyer confidence. Instantly send a confirmation or thank-you email with Mailpro when you receive new orders.
Setup
In order to use Mailpro with Woocommerce through Zapier you are required to have a Mailpro account, a Zapier account, a Wordpress installation, the Zapier Ad-On for Woocommerce (paid plugin) and of course the Woocommerce plugin installed to make a successful connection with Mailpro.